

















Two products can weigh exactly the same and still need two completely different pouches. A 500 gram bag of coffee beans is nowhere near the same size as 500 grams of protein powder or a bag of pet treats. Density, shape, trapped air, and how the product settles all play a part, and this is where most brands get their sizing wrong. Picking a size straight off a generic weight chart usually ends with a pouch that looks half empty or one that barely zips shut.
This guide gives you a flat bottom pouch size chart built around real products, not just small, medium, and large labels. You’ll learn how width, height, and gusset actually work together, what changes the recommendation for coffee versus pet food versus powder, and the small mistakes that lead to a reorder. Treat the chart as your starting point, and the rest of this guide as the checklist that gets you to the size that fits.
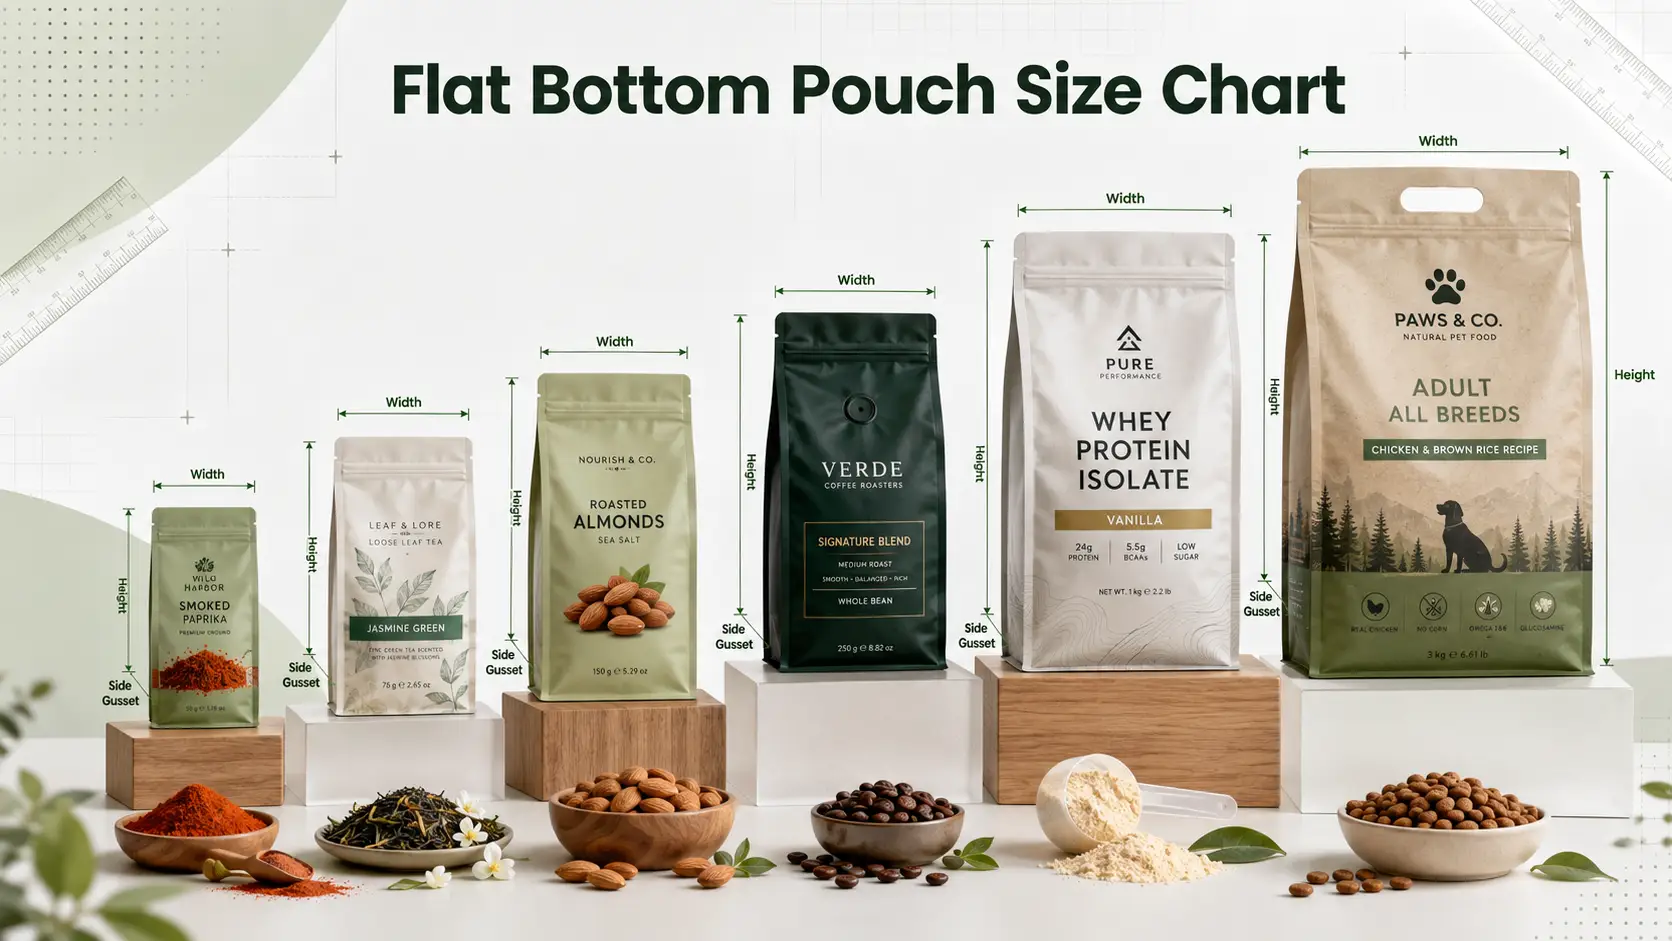
Flat Bottom Pouch Size Chart by Product
Flat bottom pouches, sometimes called box bottom pouches, are described by three numbers: width, height, and side gusset. But the number that works for your product depends on more than fill weight alone. The chart below gives you a realistic starting point for common products, based on how each one typically behaves once it’s packed.
Match your product to the closest row, not the exact fill weight. A bag of granola and a bag of trail mix at the same weight can still need slightly different sizes once you factor in piece size and how much air sits between pieces.
If your product isn’t listed below, sort it into one of these four groups first, then borrow the closest match from the chart:
- Light and fluffy (tea, popped snacks, freeze-dried fruit): size up from the closest weight match. These need more room per ounce than the chart weight suggests.
- Medium and irregular (nuts, granola, treats): use the chart weight as written, then adjust slightly for piece size.
- Dense and fine (powders, flour, spices): size down a little. These pack in tighter than the chart weight suggests.
- Bulky and heavy (whole beans, kibble, large treats): match on weight first, then check the gusset depth against your product’s density.
| Product | Common Fill Weight | Starting Size (W x H x Gusset) | Add These Features | Watch For |
| Whole coffee beans | 12 oz | 5″ x 8.5″ x 3″ | Zipper, degassing valve | Leave room above the fill line for the valve |
| Ground coffee | 12 oz | 4.75″ x 8″ x 2.75″ | Zipper, valve optional | Ground coffee packs down tighter than beans |
| Loose-leaf tea | 4 oz | 4″ x 6″ x 2″ | Zipper | Tea is light and fluffy, it needs more room per ounce |
| Nuts and trail mix | 8 oz | 5″ x 7″ x 2.5″ | Zipper, wide opening | Air gaps between pieces vary by batch |
| Granola and cereal | 12 oz | 6″ x 9″ x 3″ | Zipper, wide opening | Expect visible settling after transit |
| Dried fruit | 6 oz | 4.5″ x 7″ x 2.5″ | Zipper | Sticky pieces can clump near the seal |
| Sweets and confectionery | 8 oz | 5″ x 7.5″ x 2.5″ | Zipper or tear notch | Small dense pieces settle fast |
| Protein powder | 1 lb | 5.5″ x 9″ x 3″ | Zipper, wide opening | Keep the seal area free of powder dust |
| Flour and baking mixes | 2 lb | 6.5″ x 10″ x 3.25″ | Zipper | Packs down tighter than most powders |
| Spices and seasonings | 2 oz | 3.25″ x 5″ x 1.75″ | Tear notch | Small pouch, little margin for sizing error |
| Pet treats | 8 oz | 5″ x 8″ x 2.75″ | Zipper, wide opening | Treat shape affects fit more than weight |
| Dry pet food | 4 lb | 9″ x 13″ x 4″ | Zipper, handle, wide opening | Wider base needed for shelf stability |
Important note: Every size in this chart is a starting point, not a guaranteed capacity. Bulk density, piece shape, and how the product settles after packing can all shift the real fit, sometimes by more than you’d expect for products that seem similar on paper. Use this chart to shortlist two or three sizes, then confirm the final one with a real product test before you order in bulk.
How to Read Flat Bottom Pouch Dimensions
Flat bottom pouch sizes are written as width x height x side gusset. Each number does a different job, and getting one wrong throws off the whole pouch, even if the other two are spot on. Once you know what each measurement is actually doing, the chart above starts to make a lot more sense.
Width
Width sets the size of the opening and the front panel. A wider pouch gives you more room for branding, and it makes filling and scooping easier. Go too narrow and even the right amount of product becomes awkward to pour or scoop out. The opening size is really the main thing to check here, along with how much front-panel space your artwork needs.
Height
Height covers more than the visible pouch. It includes space taken up by the zipper, tear notch, and top seal, plus whatever headspace your product needs. This is why the listed height is always a little taller than the actual usable fill area. If a standard height doesn’t leave enough room for your features, the custom sizing options can solve that without forcing a fit.
In practice, that extra height usually breaks down into:
- The zipper or tear notch area
- The top heat seal
- Headspace for sealing, product movement, and gas release where needed
Side Gusset
The side gusset is what gives a flat bottom pouch its shape and lets it stand upright with a flat base. A deeper gusset means more capacity and a wider footprint on the shelf, and it’s the main thing standing between a pouch that holds its shape and one that tips over once it’s full. As a rough guide, gusset depth works best at around 35 to 50 percent of the pouch width. Go much deeper than that and the pouch can look bottom-heavy or unstable once it’s full.
Choosing a Flat Bottom Pouch Size by Product
The chart above gives you a number to start with. Here’s the reasoning behind those numbers, broken down by product type, along with what tends to trip brands up in each category.
Coffee and Tea
Whole beans and ground coffee behave differently, even when the fill weight is identical. Beans trap more air between them. A 12 oz bag of beans ends up needing slightly more room than 12 oz of ground coffee. Most coffee pouches also need a degassing valve, because fresh coffee keeps releasing gas for days after roasting. Leave enough headspace between the fill line and the valve, or the valve can clog with loose grounds over time.
Loose-leaf tea is lighter and fluffier still. It needs more volume per ounce than either coffee format. Most coffee and tea pouches include a zipper too, because both are repeat-use products that get opened and closed many times before they’re finished.
Quick check for coffee and tea:
- Confirm valve clearance above the fill line for whole bean coffee
- Add a zipper to any pouch meant to be reopened and reclosed
- Size tea slightly larger than coffee at the same weight
Snacks and Dry Foods
Nuts, granola, dried fruit, and sweets all pack differently because the pieces aren’t uniform. Irregular shapes leave air pockets that a fine powder never would. That’s part of why two snacks at an identical weight can need different pouch sizes. Granola and cereal settle a fair amount during shipping in particular. A pouch that looks perfectly full at the factory can end up looking half empty by the time it reaches a shelf.
A wide opening helps here too, because most of these products get poured or grabbed by the handful rather than scooped out. If you’re packaging a range of snacks, compare a few sizes through the retail food pouch options before settling on one for the whole line.
Before you lock in a snack pouch size:
- Test with the actual product shape, not a stand-in like rice
- Choose a wide opening for anything eaten straight from the bag
- Expect visible settling after shipping, especially with granola and cereal
Powders and Supplements
Protein powder, flour, and spices are dense and compact. That means they generally need less volume than a lighter product would at an equal weight. The tricky part with powders isn’t really the size, it’s the seal. Fine powder tends to drift into the seal area during filling, and that can weaken the seal if the opening is too narrow for a clean pour. A weak seal is one of the most common causes of returns for powder products.
A slightly wider opening gives more room for a scoop or funnel and keeps powder away from the seal line. Anyone packaging supplements or nutritional powders should also account for scoop size if one ships inside the pouch. That adds a little extra to the required headspace.
Things to double check with powders and supplements:
- Keep the fill opening wide enough to avoid dust settling near the seal
- Account for scoop space if one ships inside the pouch
- Size slightly smaller than a lighter product would need at the same weight
Pet Food and Treats
This is the category where shape matters more than weight. A bag of small, uniform treats packs very differently from a bag of large, irregular ones, even at the same 8 oz fill weight, because irregular treats leave more air between pieces than a tightly packed uniform shape. Dry pet food in larger formats needs a wider base for shelf stability, and it often benefits from a handle, since these bags get carried around a lot more than most, both in store and at home.
For pet food packaging, test with the actual treat or kibble shape rather than relying on weight alone. Two brands’ kibble can vary quite a bit in size and density, even within a similar weight range. A wider base for large or heavy bags and a handle for anything over 2 lb are both worth adding at this stage, not after the run has already shipped.
Why the Same Pouch Holds Different Products Differently
This is the part most size charts skip, and it’s the reason the same pouch dimensions can hold noticeably different weights depending on what’s inside.
Product Density
Dense products like powders and flour need less physical space per pound than lighter products like cereal or tea. Two pouches of identical size can hold very different weights once you factor this in. This is why a 1 lb bag of flour looks noticeably smaller than a 1 lb bag of popcorn in the exact same style of pouch.
Product Shape
Large or irregular pieces leave gaps between them that small, uniform pieces don’t. A bag of whole almonds has more empty space inside it than a bag of finely ground almond flour at the same weight. That’s also why two products with identical net weight can still need different gusset depths.
Trapped Air and Settling
Granola, cereal, coffee, and some powders all trap air during filling. That air escapes over time, especially during transport, so a pouch that looked completely full on the packing line can look noticeably lower a week later. It’s a normal part of how these products travel, and it’s the main reason a filled pouch needs more than one check before you sign off on it.
Required Headspace
Extra space above the fill line isn’t wasted space, it’s doing a job. Cutting it too tight to save material almost always causes more problems than it solves. Headspace usually allows for:
- A clean heat seal without product caught in it
- Smooth zipper opening and closing
- Room for the product to shift during handling
- Gas release for products like fresh coffee
- Natural settling after the pouch is packed
How Pouch Features Affect the Recommended Size
Some features change how much usable space is left inside a pouch, even when the outer dimensions stay exactly the same.
Zippers and Top Seals
A zipper and its surrounding seal area take up real height. On a smaller pouch, this can account for a noticeable chunk of the total size. That’s one reason two pouches with the same outer height don’t always hold the same amount. Keep it in mind when comparing two suppliers’ size charts side by side.
Degassing Valves
Coffee pouches usually include a one-way valve to let gas escape without letting outside air in. The valve needs clearance above the fill line, otherwise beans or loose grounds can sit against it and eventually clog it. Most coffee brands find a gap of around half an inch to an inch above the fill line is enough to keep the valve clear.
Windows, Handles, and Wide Openings
A window for product visibility, a handle for carrying, or a wider opening for scooping can all shift the size you actually need. Decide on these early, because adding a feature after the size is locked in usually means adjusting the dimensions too. A handle in particular adds a bit of extra height that’s easy to overlook when you’re comparing dimensions on paper. Check the custom pouch features page if you’re still weighing which ones to include.
How to Confirm the Right Flat Bottom Pouch Size
The chart narrows things down. Testing is what confirms the winner. A pouch that reads perfectly on paper can still disappoint once your real product is inside it, and that gap is exactly what this step is meant to catch.
- Shortlist two or three sizes from the chart: one compact option, one likely best fit, and one slightly larger.
- Fill each sample with your real product at the target weight. Rice or sand won’t tell you anything useful here.
- Check the fill level, headspace, zipper closure, seal clearance, opening width, and how the pouch stands once it’s full.
- Let the filled pouch sit for a day or two and check it again once the product has had time to settle.
- Approve one sample or prototype before committing to a full production run.
Important note: A pouch that looks perfectly full on day one can look noticeably lower a week later once the product settles during storage or shipping. Always retest after settling before locking in your final size.
Common Flat Bottom Pouch Sizing Mistakes
These come up again and again with flat bottom pouches specifically, more than with any other pouch style. Most sizing problems trace back to one of these:
- Choosing a size by weight alone, without checking density or shape.
- Using a stand-up pouch chart for a flat bottom pouch. The two shapes don’t measure the same way.
- Treating the chart’s listed capacity as guaranteed rather than a starting estimate.
- Ignoring how product shape and density change the real fit.
- Forgetting to leave room for the zipper and heat seal.
- Picking an opening too narrow for scooping or pouring.
- Ignoring how much the product settles after packing.
- Committing to a full production run before running a real fill test.
Any one of these can mean reordering an entire run, so it’s worth ten minutes with a sample pouch before placing a bulk order. Most of these mistakes are easy to catch once you know to look for them, and none of them require anything more than a filled sample and a bit of patience.
Find the Right Flat Bottom Pouch Size for Your Product
A size chart gives you a solid starting point, but your product has the final say. Density, shape, trapped air, and settling all shift the real capacity away from the number on the page. Match your product to the closest chart entry, adjust for the details above, then test before committing to a full run.
Still Unsure Which Pouch Size Fits Your Product?
Share your product type, target fill weight, and any features you need with the Flexible Pouches team. We’ll help you compare sizes, talk through gusset depth and headspace for your specific product, and confirm the right flat bottom pouch dimensions before production, with no upcharge for custom sizing.
Request a Pouch Size Recommendation
FAQs
1- How are flat bottom pouch sizes measured?
Flat bottom pouches are measured as width x height x side gusset, all based on outer dimensions. The actual fillable space is a little smaller once you account for the seal, zipper, and any headspace the product needs. Don’t treat the listed size as the exact usable volume.
2- What size flat bottom pouch works best for coffee?
A 12 oz bag of whole beans usually starts around 5″ x 8.5″ x 3″, slightly roomier than the same weight in ground coffee, since beans trap more air between them. Leave clearance above the fill line for the degassing valve, and add a zipper if the bag is meant to be resealed after opening.
3- What size should I use for protein powder or other powders?
Powders are dense. They generally need less volume than a lighter product would at an equal weight. Keep the opening wide enough for clean filling and keep the seal area free of powder dust. A dusty seal is one of the most common causes of a weak seal on powder pouches.
4- What’s the best pouch size for pet treats or dry pet food?
Treat shape matters more than weight in this category. Larger bags of dry pet food need a wider base for stability and often benefit from a handle for carrying, while small uniform treats can usually get away with a more compact size.
5- Why can the same size pouch hold different weights depending on the product?
Density, piece shape, trapped air between pieces, and settling during shipping all affect how much a given pouch size can actually hold in practice. Two products at the exact same net weight can look completely different once they’re packed.
6- Should I test a sample before ordering a full production run?
Yes. Fill a real sample with your actual product at the target weight, check it again after a day or two of settling, and approve a prototype before committing to bulk production. Skipping this step is one of the most common reasons brands end up reordering.